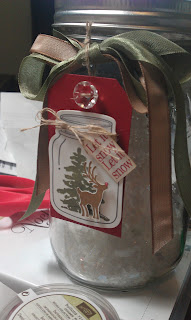
I know, Christmas is long gone. I just didn't have time to post this in December and didn't want to sit on it until next year.
I got the idea from Pinterest and I just happened to have some vintage jars I picked up in a boutique on a recent trip to St. George, Utah.
I picked up the fake snow and trees at JoAnn's. I first cut the trees to the size I wanted and then hot glued them into the jars, added the snow, sprinkled some Dazzling Diamond glitter for added sparkle ..... and there, inside the jars - ( smile:D ) - mini winter scenes.
For the finishing touch I made the tags.
I used the following Stampin' Up! supplies for the tags which can be purchased Here along with other Stampin' Up! merchandise.
Perfectly Preserved Stamp Set #126692 (clear) #126690 (wood)
Joyous Celebrations Stamp Set #128069 (clear) #126066 (wood)
Evergreen Stamp Set #127973 (clear) #127970 (wood)
Jolly Jingles Jumbo Wheel #120864
Jumbo Handle #103661
Whisper White Card Stock #100730
Always Artichoke Card Stock #105119
Cherry Cobbler Card Stock #119685
Linen Thread #104199
Always Artichoke Seam Binding Ribbon #121000
Cherry Cobbler Seam Binding Ribbon #120992
3/8" Soft Suede Taffeta Ribbon #122967
Cherry Cobbler Sweater Trim #129938
Rhinestone Basic Jewels #119246
Real Red Stampin' Write Marker #100052
Soft Suede Stamp Pad #126978
Always Artichoke Stamp Pad #126972
Basic Gray Stamp Pad #126981
Stampin' Dimensionals #104430
Aqua Painter #103954
1" Circle Punch #119868
Vintage Faceted Buttons #127555
Dazzling Diamonds Stampin' Glitter #102023
Framelit Dies - Cannery Set #127822
Big Shot-Die Cutting Machine #113439
I had so much fun making them and wanted to make some for Christmas gifts except I didn't have any more vintage jars - I solved this dilemma by purchasing clear jars from JoAnn's then used Hammered Metal spray paint from Home Depot to paint the lids - It worked perfectly!
I got the idea from Pinterest and I just happened to have some vintage jars I picked up in a boutique on a recent trip to St. George, Utah.
I picked up the fake snow and trees at JoAnn's. I first cut the trees to the size I wanted and then hot glued them into the jars, added the snow, sprinkled some Dazzling Diamond glitter for added sparkle ..... and there, inside the jars - ( smile:D ) - mini winter scenes.
For the finishing touch I made the tags.
A few more snap shots...
From the back.
I used the following Stampin' Up! supplies for the tags which can be purchased Here along with other Stampin' Up! merchandise.
Perfectly Preserved Stamp Set #126692 (clear) #126690 (wood)
Joyous Celebrations Stamp Set #128069 (clear) #126066 (wood)
Evergreen Stamp Set #127973 (clear) #127970 (wood)
Jolly Jingles Jumbo Wheel #120864
Jumbo Handle #103661
Whisper White Card Stock #100730
Always Artichoke Card Stock #105119
Cherry Cobbler Card Stock #119685
Linen Thread #104199
Always Artichoke Seam Binding Ribbon #121000
Cherry Cobbler Seam Binding Ribbon #120992
3/8" Soft Suede Taffeta Ribbon #122967
Cherry Cobbler Sweater Trim #129938
Rhinestone Basic Jewels #119246
Real Red Stampin' Write Marker #100052
Soft Suede Stamp Pad #126978
Always Artichoke Stamp Pad #126972
Basic Gray Stamp Pad #126981
Stampin' Dimensionals #104430
Aqua Painter #103954
1" Circle Punch #119868
Vintage Faceted Buttons #127555
Dazzling Diamonds Stampin' Glitter #102023
Framelit Dies - Cannery Set #127822
Big Shot-Die Cutting Machine #113439
I had so much fun making them and wanted to make some for Christmas gifts except I didn't have any more vintage jars - I solved this dilemma by purchasing clear jars from JoAnn's then used Hammered Metal spray paint from Home Depot to paint the lids - It worked perfectly!
I also made one in a self sealing jar and thought it turned out pretty cute!
Then I packaged them for gift giving using a plain gift bags decorated with with the Merry Moments Simply Scrappin' kit #126911, Greetings of the Season Stamp Set #128033 (clear) #128030 (wood) and the Decorative Label Punch #120907.
I hope you enjoyed this post and are as ready for an early SPRING as I am - Thank you Punxsutawney Phil!
Comments welcome.
Holly


.jpg)
.jpg)
.jpg)
.jpg)
.jpg)
.jpg)
.jpg)

.jpg)
.jpg)
.jpg)


.jpg)
