Showing posts with label Old is New. Show all posts

Friday, June 28, 2013

An Old Dresser Gets a Makeover

I haven't posted in a while - I have been so caught up in life now that summer is here it seems there is something going on everyday, when I do get free time I spend it painting walls. Even though I just painted the inside of the house in March of 2012 here I am painting again. Its all about color -
A girl can change her mind - right?

Any who - more about that later. On Wednesday while the handyman built new railing for the new stairs I went to work painting one of the dressers for my bedroom makeover.

I used Sherwin Williams All Surface paint in Black.

 
Here is the before.


First I disassembled the dresser and placed it on blocks.


I then used a sanding block to lightly sand the surface.
 
 
Then went over it with a damp towel to remove the dust.
 
 
Then, using an angled brush I painted the raised trim and with a foam roller (mine is approx. 8" long) I rolled the flat surfaces painting light coats. I painted three to four coats total lightly brushing on the last coat, letting it dry in between.


For the knobs I punched holes in a piece of firm cardboard with a crop-0-dile to hold them, then painted using a brush.
 
 
Finally assembling the dresser - It turned out great! The bed (I painted before we moved it back into the house) and the small dresser done - The large dresser and two nightstands to go before the big reveal.


Thanks for stopping by! Comments and questions welcome.
 

Holly


Wednesday, May 22, 2013

Sneak peek at the new floor

I have been painting a little here and there when I have time while my DH has been installing the new baseboards. It's slow going with everything else that comes up but we are slowly chipping away at it. None of the rooms are completely done at this point so I thought I could at least show a sneek peek.

 
Before -
 
Carpet in the dining room and old baseboards. You can see a little bit of the old tile in the upper left corner.
 
Tile removal - This was not fun.

 
My favorite part of the tile removal was when it was done.
 
New floor, baseboards and paint - the baseboards still need touch up paint.
 
 
 We are so loving this floor.
 
Thanks for stopping by. Comments and questions welome.
 
Holly


Tuesday, April 16, 2013

Lumber Delivery

I spent this morning running errands and searching for moving boxes. I went to Lowe's and Home Depot, neither of which had medium boxes (@*#+!) all while racing to get home in time for the lumber delivery.

Just after I arrived home my DH showed up, said he was taking the rest of the day off - So - off I went to another Lowe's where I found medium boxes - Whew! I was ready for a rest.
Just a little one - I got one soon after arriving home. This beautiful truck arrived.


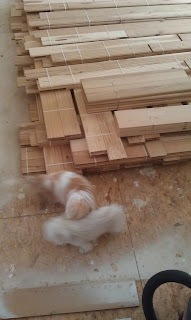
I took a break and watched these two load 3,000 lbs of hickory into our living room - Yes! - New floors!
What a beautiful sight!
 
 
Of course then the dogs had to come check it out.


Breaks over - Back to work.
 
I started packing my office/craft room.
 
 
While DH worked on the kitchen tile.
 
 
We made progress which is good as we have one week to remove all the carpets, baseboards and appliances so the installers can come in and do their thing.
 
I almost forgot one other thing I accomplished today - I registered for the Stampin' Up! Convention -  Yippee!
 
 
Thanks for stopping by. Comments and questions welcome.
 
Holly


Sunday, April 14, 2013

And the work continues


Yesterday the kids and grand kids came and moved furniture and boxes to the storage container and they also moved my grooming table to the basement. They did and awesome job.

Today I packed more boxes then moved and organized the rest of my grooming items to the basement. While Rob (DH) removed the carpet in the front room and hung the TV in the bedroom.


Removing the landing here really opened up this pass through.


Even with all the rolled carpet the front room seams bigger.


Bob had to walk around and inspect the changes.


He is still undecided.
 
 
Thanks for stopping by, Comments and questions welcome.
 
Holly


Monday, March 4, 2013

Burlap Rosette Pillow

I found the cutest burlap rosette pillow here - I had to make one for myself.

 
At Joann's, while on my way to get a pillow form I came across the clearance isle and found this throw pillow for $8.97. It is so ugly - Right?

After pricing the pillow forms, the same size pillow form was priced at $10.99, so I purchased the ugly pillow. Took it home, unzipped, removed and tossed the ugly cover and washed the pillow.
I had this lighter colored burlap and curtain liner fabric in my fabric stash and some left over burlap ribbon from another project. The Linen thread is from Stampin' Up! and can be purchased here on my Stampin' Up! website.
 
Other supplies - a large needle, natural colored thread and sewing machine.

I measured the pillow circumference adding 8" for the overlap (this will make sense later).
Then measured the width adding 1" for seams.
I cut the burlap and liner.
Then added a 1/2" hem in the overlapping ends.


Then lay the pillow form on the outside (burlap side) and fold over creating the overlap.
 
Then pin being careful not to pin the pillow form.

Remove the pillow form.
Sew the ends closed
Trim excess fabric.
Turn right side out and you are ready to stuff the pillow inside.


To make the rosettes using burlap ribbon and linen thread 
I cut 25" lengths of 5-1/2" wide burlap ribbon, I folded the end in half lengthwise then twisted and folded it over, then twisted and rolled from the inside out making the rosette.


Then, I tucked the end under and sewed it together on the back using a large needle and linen thread.


I decided on the placement for the rosettes.
Than carefully pinned them into place.
Then removed the pillow form from the cover and sewed the rosettes in place with linen thread.
 
Replaced the pillow form and.......
 
Voila!


 I tried it in a few places and this is where it landed for now.

I love it and will be making more pillows and rosettes in the future.


Thanks for stopping by! Questions and comments welcome.

Holly


Related Posts Plugin for WordPress, Blogger...