Showing posts with label Green. Show all posts

Monday, March 4, 2013

Burlap Rosette Pillow

I found the cutest burlap rosette pillow here - I had to make one for myself.

 
At Joann's, while on my way to get a pillow form I came across the clearance isle and found this throw pillow for $8.97. It is so ugly - Right?

After pricing the pillow forms, the same size pillow form was priced at $10.99, so I purchased the ugly pillow. Took it home, unzipped, removed and tossed the ugly cover and washed the pillow.
I had this lighter colored burlap and curtain liner fabric in my fabric stash and some left over burlap ribbon from another project. The Linen thread is from Stampin' Up! and can be purchased here on my Stampin' Up! website.
 
Other supplies - a large needle, natural colored thread and sewing machine.

I measured the pillow circumference adding 8" for the overlap (this will make sense later).
Then measured the width adding 1" for seams.
I cut the burlap and liner.
Then added a 1/2" hem in the overlapping ends.


Then lay the pillow form on the outside (burlap side) and fold over creating the overlap.
 
Then pin being careful not to pin the pillow form.

Remove the pillow form.
Sew the ends closed
Trim excess fabric.
Turn right side out and you are ready to stuff the pillow inside.


To make the rosettes using burlap ribbon and linen thread 
I cut 25" lengths of 5-1/2" wide burlap ribbon, I folded the end in half lengthwise then twisted and folded it over, then twisted and rolled from the inside out making the rosette.


Then, I tucked the end under and sewed it together on the back using a large needle and linen thread.


I decided on the placement for the rosettes.
Than carefully pinned them into place.
Then removed the pillow form from the cover and sewed the rosettes in place with linen thread.
 
Replaced the pillow form and.......
 
Voila!


 I tried it in a few places and this is where it landed for now.

I love it and will be making more pillows and rosettes in the future.


Thanks for stopping by! Questions and comments welcome.

Holly

Friday, February 8, 2013

Vintage Inspired Snow Scene Jars

I know, Christmas is long gone. I just didn't have time to post this in December and didn't want to sit on it until next year.


I got the idea from Pinterest and I just happened to have some vintage jars I picked up in a boutique on a recent trip to St. George, Utah.

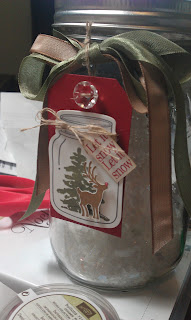
I picked up the fake snow and trees at JoAnn's. I first cut the trees to the size I wanted and then hot glued them into the jars, added the snow, sprinkled some Dazzling Diamond glitter for added sparkle ..... and there, inside the jars - ( smile:D ) - mini winter scenes.


For the finishing touch I made the tags.


A few more snap shots...


From the back.


I used the following Stampin' Up! supplies for the tags which can be purchased Here along with other Stampin' Up! merchandise.

Perfectly Preserved Stamp Set #126692 (clear) #126690 (wood)
Joyous Celebrations Stamp Set #128069 (clear) #126066 (wood)
Evergreen Stamp Set #127973 (clear) #127970 (wood)
Jolly Jingles Jumbo Wheel #120864
Jumbo Handle #103661
Whisper White Card Stock #100730
Always Artichoke Card Stock #105119
Cherry Cobbler Card Stock #119685
Linen Thread #104199
Always Artichoke Seam Binding Ribbon #121000
Cherry Cobbler Seam Binding Ribbon #120992
3/8" Soft Suede Taffeta Ribbon #122967
Cherry Cobbler Sweater Trim #129938
Rhinestone Basic Jewels #119246
Real Red Stampin' Write Marker #100052
Soft Suede Stamp Pad #126978
Always Artichoke Stamp Pad #126972
Basic Gray Stamp Pad #126981
Stampin' Dimensionals #104430
Aqua Painter #103954
1" Circle Punch #119868
Vintage Faceted Buttons #127555
Dazzling Diamonds Stampin' Glitter #102023
Framelit Dies - Cannery Set #127822
Big Shot-Die Cutting Machine #113439

I had so much fun making them and wanted to make some for Christmas gifts except I didn't have any more vintage jars - I solved this dilemma by purchasing clear jars from JoAnn's then used Hammered Metal spray paint from Home Depot to paint the lids - It worked perfectly!


I also made one in a self sealing jar and thought it turned out pretty cute!


Then I packaged them for gift giving using a plain gift bags decorated with with the Merry Moments Simply Scrappin' kit #126911, Greetings of the Season Stamp Set #128033 (clear) #128030 (wood) and the Decorative Label Punch #120907.


I hope you enjoyed this post and are as ready for an early SPRING as I am - Thank you Punxsutawney Phil!

Comments welcome.

Holly


Related Posts Plugin for WordPress, Blogger...