


I had a bit of this green fabric left from my basket liner project and decided I would use it to make a throw pillow for my bedroom. I made the pillow cover using the same method I used on my Burlap Rosette Pillow to cover a 16"X16" pillow.


I used Tulip brand Metallics fabric paint in Black. I couldn't find any labeled charcoal which is what I wanted but this is definitely not black. In the end - This is exactly the color of charcoal I was looking for with a little shimmer. The instructions on the paint say to let dry for 4 hours, washable after 12 hours.
So, I waited......
After 1 hour I removed the cardboard and stuffed my pillow form inside (I just couldn't wait - I think it'll be OK).

 I am so pleased with how it turned out - But, to tell the truth - I was only going to stencil one image in the center of the pillow until I laid the stencil on it and realized the stencil was too small or the pillow was too big - Yes, definitely one of the two.
Sew (pun intended!), I whipped out another smaller pillow, this one is 12"X12" and is the perfect size for one stenciled image!


Supplies used:
Fabric and thread to match
Pillow form
Sewing Machine
Stencil
Fabric Paint
Stencil Sponge


Once I completed the cover and tried it on for size. I removed the pillow form and inserted a thin piece of cardboard inside to avoid paint bleed through to the back.
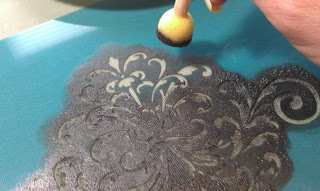
I then centered my stencil on the cover - You can tape it down if you like. I didn't have a piece of masking tape handy so I skipped that step.
Using the small stencil sponge I picked up a small amount of paint and lightly pounced the paint onto the stencil. Wanting an uneven look - I intentionally pounced lighter in spots.

I spaced my stencil and repeated until the entire front was done being careful to make sure the cardboard inside was under the spot I was stenciling. I also used an additional piece of cardboard to cover my work surface when stenciling the edges.


So, I waited......
After 1 hour I removed the cardboard and stuffed my pillow form inside (I just couldn't wait - I think it'll be OK).
And.........Voila!


Sew (pun intended!), I whipped out another smaller pillow, this one is 12"X12" and is the perfect size for one stenciled image!

I filled the stencil image in solidly on this one. I like both variations equally.


Wow! I did that!
The End (or at least the end of this fabric) "D
Supplies used:
Fabric and thread to match
Pillow form
Sewing Machine
Stencil
Fabric Paint
Stencil Sponge
Thanks for stopping by - Questions and Comments welcome.
Holly

.jpg)
.jpg)
.jpg)
.jpg)
.jpg)
.jpg)
.jpg)
.jpg)
.jpg)
.jpg)
.jpg)
.jpg)
.jpg)
.jpg)
.jpg)
.jpg)
.jpg)
.jpg)
.jpg)
.jpg)


